Well, the time passes, and as a caterpillars drop their hideous form, I dropped the "students suit" and changed into a beautiful unemployed butterfly ;) Hopefully I will get the wings open soon.
At the same time, even though I sill have some things to be done, I managed to work on the printer.
AND IT IS AWESOME :D
First of, after over a month of travel from China, my Kepton tape came to me. For those how do not know (most likely quite a lot of you), its a high temperature resistant adhesive tape.


Throughout the forums and other Reprap blogs, it is claimed to help the sticking of ABS plastic to the surface. The pics above show the tape after some usage. And my verdict is: it helps :) At the same time, throughout the prints I have done so far, I learned that the temperature of the bed can not be dropped too much after the first layer. Right now I print the 1st layer with 110C and all the others at 95C.
And now for some show-off :D
The first "real" prints I tried, were labels with the name of my PhD group:
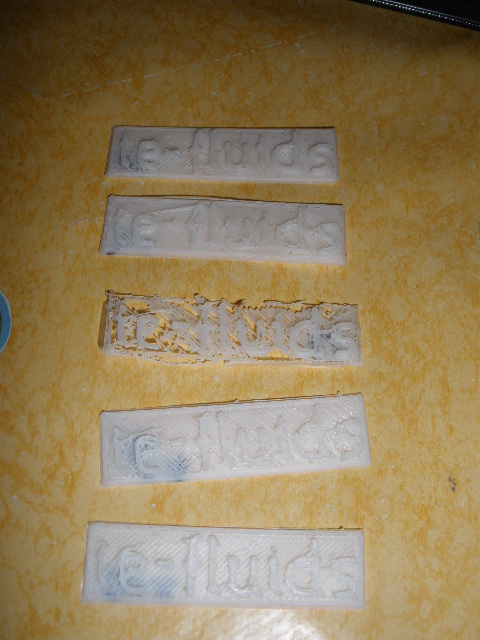
The successive prints come from the top. The first print, using my intuition to set the parameters, went really well. The small details were good, but I was not very satisfied. For the second one I lowered the speeds, thinking that this will improve accuracy. Well, the results got worse. The third print was even slower. As you can see, it did not work that well. After that there were several other trials. I had to twitch the Z-axis, change parameters, re-tape the mirror (since tape got scratched). In the end, the fourth plate from the top is version 9. Earlier stages did not get through first 1-3 layers. And the last attempt was the bottom one- version 10. Throughout those test I managed to significantly improve the quality of the bottom "big" plate. Unfortunately I lost some quality at the details, and being a bit scatty I started archiving settings starting from 2nd setting ;) Well that is a thing to learn.
And regarding the settings archive. As you may read in earlier posts, I use Slic3r for "g-code" generation and Pronterface for printer control. I plan to start posting my Slic3r settings later for common benefit, but this will happen when I will feel that they give good enough results.
Now, the labels were done few days ago (though will get back to them soon), and today I did some more printing. This time I took on the workshop the issue of my electronics just laying on the table. I would like to have it attached to the printer. With that in mind, I made some parts:


You can see 5 prints, but only 3 are good. The first one failed when the left leg dis-attached itself from the bottom. The second one was going quite good, until it also got peeled off the plate. That was the moment I realized that I need to keep the plate's temperature higher throughout the whole print.
If you look closely, you will notice that the third print is not done completely. There are 3 layers missing. What happened is that I run out of plastic. Of course there is an option to pause the print and replace the filament. Well, I did just that, but again, being a bit scatty I pressed the button Restart instead of Resume. The software does not forgive this kind of mistakes... At the same time, the part was already done to the level, that I think I will still use it. Now for the two other ones- just take a look in owe :) I still need to clean them up a bit, but this is necessary after most of the prints. In whole honesty, I have to admit that I am still having some issues with the first layers, and I believe that I may get a better quality, but gosh darn it! These parts are freaking cool :D
And now regarding the last print today- we do not have much space at home right now, and I have been occupying it quite a bit with my machinery, making tones of racket with the engines for few hours. For that reason I just had to do the following. What you are about to see are the beautiful hands of my lovely, patient, and supportive wife holding a small piece I printed for her. Enjoy and feel special for having the possibility to watch those pictures ;)


If you have been wondering, I made all the designs used for prints mentioned in this post (and there are more to come, just waiting on the hard drive). I used the open-source design environment Salome to generate *.stl files (which originally I use to prepare meshes for my fluid dynamics experiments). If you are interested in the designs- just contact me ;)
That is it for today! Expect more and more posts coming soon, with more and more awesome prints! One day maybe even a movie ;) Till the next one!