09 January 2014

Get-back post and the spool holder

It’s been a long time… I believe there were not so many visitors here, so even the disappointment of the lack of content was not so big. People whom I told about this page took a look long time ago, and according to google statistics, there are two other kinds of people getting here: ones that looked for a particular odd sentence and others that were seeking porn. Funny enough the second group of “random visitors” is bigger than the first. It seems naked machines are a real treat :)
Let’s get back to the printer. Even though I haven’t written much (or more precisely- nothing), it does not mean the reprap was standing in the corner catching dust. Well, all right, most of the time it was. Still I managed to do some stuff that will most likely fill two or three entries of this blog. I have to also confess that most of the photos will be made quite late post-factum. Deal with it.
The first things I worked on were connected to the printer. In the old post I described the electronics holders- now it was time for the clumsy plastic spool.
I decided it should be mounted onto the printer on some of a frame. I had quite a bit threaded 8mm rods, so they were to become the main construction. I found out that there will be two kinds of things required: several clamps to bind the rods and the "top" frame part with a fork to sustain the spool on a stick.
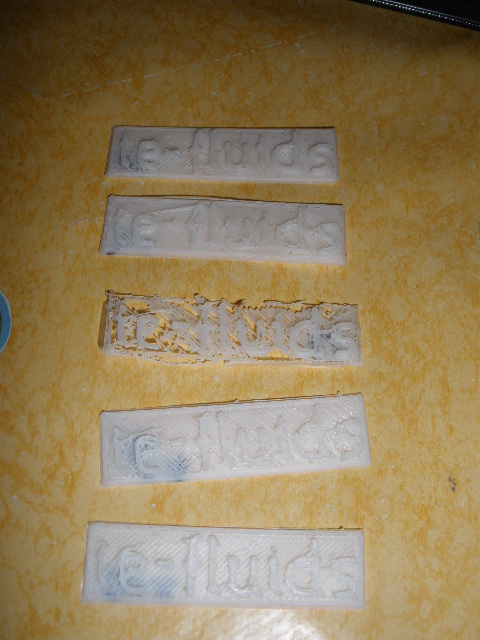
In order not to develop the wheel again, I chose the same clamps that were used in the printer itself. After setting up the printer and around an hour of printing I had nice 12 clamps ready. I printed first 1, then another, then 2, then 4 and finally 4. All to be sure that if it starts to screw-up, I will not loose too much time. Here are the models and the result:


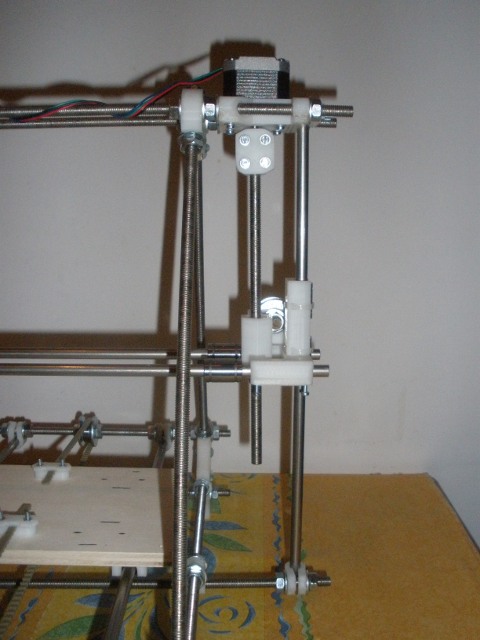
After that there was the "U" shape to hold the spool. There was some fun with development of the model, with the following result. Also I give a post-factum close-up picture of the part itself.


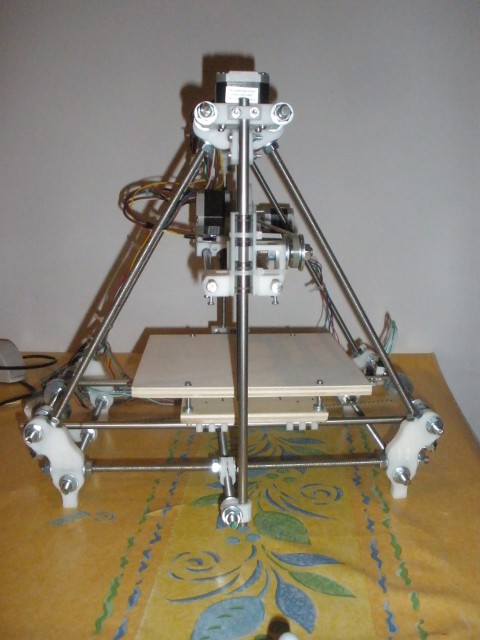
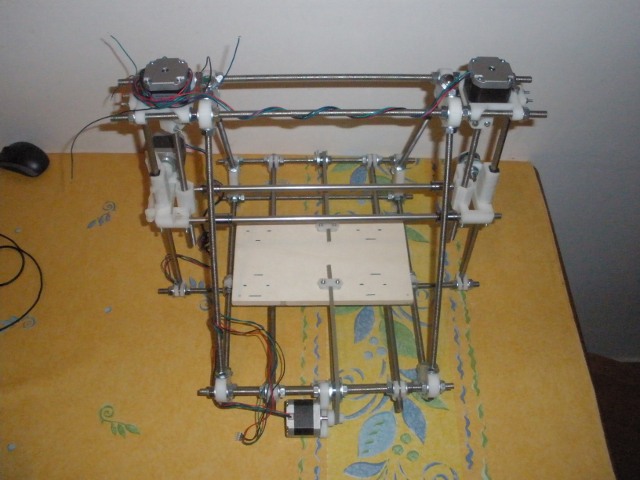
And finally, here is the "new" printer with an awesome frame to hold the plastic spool. It makes the threading much easier. During later work with the printer I found out that the spool does not unwind itself during process- it is too heavy and the plastic is a bit tangled. This might cause the blockage or problems with feeding. Yet it is much easier just to turn the spool on the frame opposed to playing with it when it is laying around. And the whole thing is much more compact and easier to move.


That is it for the come-back post. There are much more to come, so if you are just tuning in, stay on ;) Till next time!

17 May 2013

It's printing time!

Well, the time passes, and as a caterpillars drop their hideous form, I dropped the "students suit" and changed into a beautiful unemployed butterfly ;) Hopefully I will get the wings open soon.

At the same time, even though I sill have some things to be done, I managed to work on the printer.
AND IT IS AWESOME :D

First of, after over a month of travel from China, my Kepton tape came to me. For those how do not know (most likely quite a lot of you), its a high temperature resistant adhesive tape.


Throughout the forums and other Reprap blogs, it is claimed to help the sticking of ABS plastic to the surface. The pics above show the tape after some usage. And my verdict is: it helps :) At the same time, throughout the prints I have done so far, I learned that the temperature of the bed can not be dropped too much after the first layer. Right now I print the 1st layer with 110C and all the others at 95C.

And now for some show-off :D

The first "real" prints I tried, were labels with the name of my PhD group:


The successive prints come from the top. The first print, using my intuition to set the parameters, went really well. The small details were good, but I was not very satisfied. For the second one I lowered the speeds, thinking that this will improve accuracy. Well, the results got worse. The third print was even slower. As you can see, it did not work that well. After that there were several other trials. I had to twitch the Z-axis, change parameters, re-tape the mirror (since tape got scratched). In the end, the fourth plate from the top is version 9. Earlier stages did not get through first 1-3 layers. And the last attempt was the bottom one- version 10. Throughout those test I managed to significantly improve the quality of the bottom "big" plate. Unfortunately I lost some quality at the details, and being a bit scatty I started archiving settings starting from 2nd setting ;) Well that is a thing to learn.

And regarding the settings archive. As you may read in earlier posts, I use Slic3r for "g-code" generation and Pronterface for printer control. I plan to start posting my Slic3r settings later for common benefit, but this will happen when I will feel that they give good enough results.

Now, the labels were done few days ago (though will get back to them soon), and today I did some more printing. This time I took on the workshop the issue of my electronics just laying on the table. I would like to have it attached to the printer. With that in mind, I made some parts:


You can see 5 prints, but only 3 are good. The first one failed when the left leg dis-attached itself from the bottom. The second one was going quite good, until it also got peeled off the plate. That was the moment I realized that I need to keep the plate's temperature higher throughout the whole print.
If you look closely, you will notice that the third print is not done completely. There are 3 layers missing. What happened is that I run out of plastic. Of course there is an option to pause the print and replace the filament. Well, I did just that, but again, being a bit scatty I pressed the button Restart instead of Resume. The software does not forgive this kind of mistakes... At the same time, the part was already done to the level, that I think I will still use it. Now for the two other ones- just take a look in owe :) I still need to clean them up a bit, but this is necessary after most of the prints. In whole honesty, I have to admit that I am still having some issues with the first layers, and I believe that I may get a better quality, but gosh darn it! These parts are freaking cool :D

And now regarding the last print today- we do not have much space at home right now, and I have been occupying it quite a bit with my machinery, making tones of racket with the engines for few hours. For that reason I just had to do the following. What you are about to see are the beautiful hands of my lovely, patient, and supportive wife holding a small piece I printed for her. Enjoy and feel special for having the possibility to watch those pictures ;)


If you have been wondering, I made all the designs used for prints mentioned in this post (and there are more to come, just waiting on the hard drive). I used the open-source design environment Salome to generate *.stl files (which originally I use to prepare meshes for my fluid dynamics experiments). If you are interested in the designs- just contact me ;)

That is it for today! Expect more and more posts coming soon, with more and more awesome prints! One day maybe even a movie ;) Till the next one!

16 March 2013

Finally! modifications and first prints!

Greetings internet!

Finally, after over 2 moths I post something. (I am aware it proves I am a poor blogger, but what meh...). In fact the main reason there were no post was that there was nothing to report. I am having one of the most tense periods in my file, and the printer simply went into the second range of interest.

Anyway, playing with my RepRap still proves to be a great way of "getting away from wicked reality", so throughout these moths I found like 3 evenings to look into it, and here are the results.

In the last post I mentioned that I needed to add a heated bed, and get a better hobbed bolt.
These things were acquired. The bolt was a tiny thing, costed like 7eu with shippimg, and I got it from a very nice guy from UK. The heated bed was a bigger deal, still did not kill me with its price. I got it from eBay page of Reprap.me, and paid 40$ (30.5eu).

Of course after I got the parts, they lied a lot of time. Finally they caught my eye and got mounted.
Here are some pics:


Looks quite nice, doesn't it ;) The addition of heated bed made it necessary to move the printing layer up, as seen on third picture. The heated bed requires to have a thermocouple to measure its temperature. The bed has a tiny hole in the middle, where you are supposed to put it. There was some fun with that (especially to make it stable) but as seen in the fourth picture, I managed to to that :) Regarding the hobbed bolt- it went into the extruder.

Now, we have the printer ready. There was some calibrating to be done. First- level the whole thing. After that, there was the fight with matching proper extruder engine speed. It was going too fast, thus insted of pushing the filament, the bolt was also "drilling" it. In the end the drilled hole was so big that the filament could not move down. I re-calculated the parameters like 10 times, and still there was something wrong. All the problem revolves around converting rotation distance of the engine, through the gears onto the bolt. Finally I found out that there are two ways that the G-code (language of the printer) interprets the distance of extrusion: absolute and relative. Of course I had the wrong one selected. After selecting "relative" the extruder slowed down and it seemed that I can start the work!

As the first print, I decided to try a "test" geometry. Here is how it looks like:
My extruder nozzle diameter is 0.35 mm. I chose the layer height at 0.35 mm, took a layman look at other ones and started the print. Here is the result:


Well, its not hard to tell that something went wrong ;) In fact most of the parameters were off. The extruder and bed temperatures, the layer thickness, the speed of all motors, well, almost all. After giving even more thought into selecting them (and after reading all of them carefully :P ), and after several unsuccessful initialization, I made the second print:


You have to admit it looks much, much better! There was some trouble with initial layers, and the 3rd to last one did not stick properly, resulting in crippled arch in the top-left part. but overall I have to say that am very proud of it :)

After that success I thought- why stop now? I twitched a bit the parameters again, and started a print of a pulley:
In fact I need one like that to replace the one on the extuder motor- my current one has some irregularities, resulting in some clearance between the gears.

This was a nice experience. I learned that I can not be cheap, and save on electricity too much. After printing the first layer I instructed the printer to lower the bed temperature from 110 centigrade (for ABS plastic to stick) to 60 centigrade. That was s bad call, since after few layers, during printing, the nozzle touched some irregularity on the part and disconnected it from the bed. Of course this destroys the print immediately. Here are some pics of what was done before the print broke:


As the last thing in this long post I want to address a health and safety issue. When your printer is idle, and just a moment ago you extruded some plastic, the pressure will push some of it out. It is a common practice to take it away using some pliers. You will often do that during heating of the nozzle. REMEMBER! The current going through the heating resistor is high! Always use insulated pliers. Also, be very careful not to connect the resistor wires to anything grounded with your pliers. I learned the hard way. During "plastic removal" I touched the resistor wire and the thermistor one. There was some light, sparks, heat and a melted wire. Here is a picture of the nozzle with modified wire positioning and "repaired" thermistor. Fortunately it did not burn and works, but still I will replace it as soon as I get some cash for it.


As a note- the white goo is a thermal paste used in computers for better conductivity. The brown spots are the burned plastic. I still work on getting proper nozzle temperature.

Well, that is it for today. I am finishing my PhD shortly, so expect that just after that there will be a lot more printing, and more content on this blog! :)

See you later!

16 January 2013

New Year's post

Greetings!

Time for some New Year's update.

First of all- hardware like things have not changed much. Well, I fixed the jamming axis.
The Z one required some twitching, levelling and some love, and started to work.
The X jam was present because of a moron who attached the wires using a clipper onto the X tray rod (yeap, that would be me).

After working out the hardware, I moved to software.
Gen 7 electronics is recommended to run with Teacup firmware. There was some fun with setting up the config files, but I think I managed to make it work.
I decided to use Printrun (or Pronterface) as a main end-user interface. Printrun is just for controlling the print. It takes G-code (low-end language describing the print) and sends it to the firmware command by command. It also allows for manual printer management. Unfortunately it does not have embedded programs that allow to change STL schematics to G-code. By default Printrun sends you to another program: Skeinforge, which takes STL, slices it and produces G-code. For some reason Skeinforge was too much for me and I decided to use Slic3r as a slicer ;) Unfortunately now I have to manually generate the G-code in Slic3r and then load it in Printrun. A little inconvenience, but will deal with it later.

Having software sort-of-set-up, I tried to print something. Not surprisingly it did not go as I planned. The best print so far looked like a ball of hair you get after cleaning your comb. Well, far from perfect. I played a bit with the software but it seems that I am stuck with 2 hardware problems. First: the hobbed bolt that pushes the plastic into the extruder is bad. I made it myself and have to say it looks as good as it can with the limited access to tools I have. But it is not good enough. Second thing is the lack of heated bed. The ABS plastic simply does not stick to the surface, and without a first layer... well you get it. In order to overcome both issues, I simply ordered the parts on eBay. We will see how it goes after they arrive.

That is it for today, see you next time!

14 December 2012

The Thing moves!

Good evening everyone!

Today is a big day. A truly great day. Its the day when I wired the printer, turned it on, loaded the software and managed to move it! Even better- I did not burn anything!

OK, enough self-applause, back to the facts. I managed to repair the broken path on the PCB board. Note to self- never use cheap solder that you get in supermarket for 1 euro. Well, maybe it is a good solder, but it requires higher temperature to work with. Such power is not provided by my simple 15W iron. In effect, I made the whole area around the "break" dirty with solder. Fortunately managed to clean the short-bridges, and everything works fine. Here is the picture of the repaired board:


Before we move forward, I have to admit that there were some sparks when I tried to measure the voltage on endstops. But it happened only once and were only my clumsy hands making short circuit :P I also had to redo the cables to endstops (signal and voltage were mixed).

And now, for the pictures of the mounted RepRap that I promised last time (but was to lazy to post).


And FINALLY! The fully mounted, fully wired printer! Of course it still needs calibration and minor fixes, but it moves and heats and measures temperature and reads endstops! It appears that I made the wiring on the "left side" since I had to switch rotation directions for all engines using software. But it works. Second note to self- having experience with wrong wiring of endstops, check the wires of the engines...


Hope you liked this little show off ;) See you next time, when hopefully I will describe how the X and Z jamming were fixed. Also maybe we will put some plastic into the hot-end :) And most of all, I will try to make a movie with the printer working! Hold your thumbs! Ciao! :D

10 December 2012

Its "built", still far from "done"

Hello again!

Time is running out, there are just 15 days till the end of the world, and most importantly 21 days till the end of the year! And I have told so many people that the printer will be working by that time, that I will feel really stupid if it does not :P

Now for the news.

I built it.
The printer I mean.
Its done.
I mean...

...everything is mounted, wired, etc. Ready for plugging in. In fact I did try it out yesterday. The electronics fried :D Here is how it was: I plugged the wires to the endstops, hot-end and termistor, not to the engines (was afraid). Wanted to test one thing at a time. That was a good call, since the circuit path delivering power to the endstops fried, vaporised, burned, you get the picture. Hopefully it was just not "big" enough to sustain given current load, and that there are no short circuits on the board.
The good news is that the board communicates with my PC, loads the programs and seems to be cooperating.
Now it is "just" to repair the board, calibrate the printer, install newer Ubuntu (I am mad as hell for that. The so called Pronterface python script for easy use of the printer works only for Ubuntu 10.10 and higher. I love my 10.04...) and probably looots of lesser tweaks. That's the fun ;)

There will be no photos right now, deal with it. Yes, yes I know "pics or didn't happen"- well, maybe today evening.

Have a nice snowy day :)

13 November 2012

Late news

Greetings Internet!

Today I am sick, and finally found a minute to write this post.
I can proudly say, that my RepRap is getting very close to being finished.
Most of the printer is already assembled. The remaining parts ale half finished.
Unfortunately in the last weeks, and for sure in the following ones I will not push the project further... It would be fun to change a hobby into an everyday work ;) but for the moment I have "real" tasks that need my attention.

In addition to that, I am waiting for the TTL-USB converter piece that is traveling from the US. It has been doing that for the last 1,5 week, ehh conventional mail. Without it, I can not connect the printer to the computer- thous, can not start the finishing touches and calibrations.

Anyway, here are some pictures from like 2 weeks ago. I have had not moved further from that point- pity...


As it can be seen, the Y and Z axis are already assembled, so is the X motor. The carriage is waiting for finishing of the extruder. I have to prepare a bolt with teeth that will push the plastic into the hot-end. Again, loaded time blocks the progress. After the bolt is done, it will be just to put several screws, clip the carriage to the bearings on the X axis, put the X motor belt, wire everything and we can start printing! Hope this will happen till first half of December :P

Aside from work related issues, I am being held back by more hardware related events. The major one was breaking of my computer. Unless I manage to fix that bugger, the first prints will be guided by my wifes laptop. Not that she has something against it, but still... you now ;)
For that reason I began wondering about purchasing and incorporating a Raspberry PI mini computer. I know people are using them with success to guide 3D printers, and it would be cool to join that trend.
At the same time, I also started to get the feeling that I am over the budget for this project. Yes yes, there was no budget, but I roughly knew how much I wanted to spend to make a Reprap. And even thought Raspberry PI is only like 35$, it is another not essential "gadget" that will drive the costs even more: mouse, keyboard, a monitor (I do not have one- only laptops, not even a TV), possibly a VGA-HDMI converter, USB hub... The prices start to add up fast. For that reason, I think I will hold with Raspberry PI till I finish the printer, and start printing. With some luck, I will initiate this "sub-project" early next year (if we survive 23rd December Muahahaha-doom-doom-dumb-dumb!).

Well, basically thats the state of the art for today. Hold your thumbs, and wish me luck with normal day work, so I can get back to that what is fun- the RepRap :) See you!