01 July 2014

Tablet drive- GCodePrinter

When I was looking through the old posts for the total price of the printer I noticed that there was a plat to buy an old PC to run the control software on.
It is no longer the case. Some time ago I got a Lenovo tablet as a present. In the Google Play Store I noticed an awesome application called GCodePrinter. It costs like 4 euro and changes your toy-tablet into a mighty tool for steering devices of the future! OK, I I got a bit too excited ;)
If your tablet has this magic cable that allows USB to be connected to it (for memory sticks etc), you can try to put the printer under its control. Here is a picture of my printer being driven by a tablet. It looks super geeky great and works too!

Spoiler: the printed part is an element of the big awesome project.

As I wrote, it looks nice and all. Unfortunately it might get into some trouble. I made some nice prints, but one time it happened that the tablet went to hibernation (or something) and second time there was some communication error. This of course resulted in the stop of the print, and the part got wasted (I still have to find out a way to safely restart broken prints). For that reason, although it looks cool, I prefer to print bigger parts under PC control. It simply seems more reliable.

30 June 2014

Y-axis upgrade

I mentioned in the previous post that for the last months I was working on a bigger project with the 3d printer. Just at its beginning I noticed that there was something wrong when circular objects were printed. They were a bit oval, definitely not nice and circular. I figured out that this is because of loose tension on the Y-axis belt. I could theoretically adjust the tension on the end points where it is attached to the moving bed. Unfortunately way my printer is built makes it a bit hard to do (you would have to dismount a big piece of the bed which is tricky to put back together).

The printer worked but the results, especially the precise ones with complex and circular borders did not look very well.

I decided to add a new part that would divert the belt a bit thus putting required tension on it.

After a short session with FreeCAD, even shorter slicing in new version of Slic3r and around half an hour of printing I had the necessary part. After adding the metal screws with some nuts and using spare bearing and washers the part was installed onto the printer.


The results after the upgrade were very satisfying. The circular objects looked circular :) After this moment I was convinced that was ready to work on parts that require decent level of precision.

A small digression- during the printing a major damage happened twice to the Y-axis pulley gear (you can see it in the picture above). It broke at its bottom. Of course I had to print the part and replace it. As you can image since the printer was broken it was not an easy task. Fortunately the glue held long enough to make the new print. It seemed that there will be no trouble but the part broke again. It seems the tension on it is too big (the engine's shaft is not going all the way through the pulley). The second time I made the part full in plastic- no saving for inner layers. I also treated the surface with acetone vapor to make it even stronger. Till now all is good. Of course I made an additional spare pulley (just in case) :)

29 June 2014

Fun with earrings

Good day everybody,

This post is a teaser before I publish the info about the big 3d printing project I have been working on for the last few months.

Recently me, my wife and some good friends of us started playing the rpg in the WH40k world- Rogue Trader. Since my second half's character is a member of Adeptus Mechanicus (some tech-nuts priest engineers), I wanted to make earrings that would be appropriate for her status.

Since it seemed cool idea to make 3d printed earrings I made a second small project to demonstrate the constant fight that a measly mortal soul is being in a middle of. Below are the results :)


As you can tell they are already pre-painted. There will be some "rust" added to the wheels and definitely the angels wings shall be white ;)

One more interesting fact about this projects. It was the first time I tried the acetone vapor bath on the parts. You take a jar, drop a little bit of acetone on the bottom and then put the jar into the pot with hot water. Acetone vaporizes very fast and creates "melting atmosphere" in which you put the parts for few minutes. The idea is to melt the outer layer of plastic to give it a smoother surface looks. Here is the picture of the setup.
WARNING! Acetone vapor might be dangerous to you. Always work in a well ventilated location, and if are underage- ask an adult for assistance. I believe in your intellect but I take no responsibility for any of your actions. You have been worn :)


Furthermore, be advised that if you keep the parts for too long, the plastic will melt too much. Small elements of the print are most affected. Well, here is a very "saaad angel". It was irreparable and had to make another one.


And finally, the parts are a bit sticky after you take them out of the acetone vapor atmosphere. Make sure they "dry out" a bit before you make them touch any surface. Here are the earrings after the process drying a bit more (the paper towel was not the best idea, fortunately they were not too sticky at that time).


That is it for now. Await the glorious big project that is to come soon!
Ciao!

ps
If you are interested in getting earrings like that, or have some other idea- just give me a note. Maybe we can work something out together ;)

17 March 2014

History continues: " A small success"

One of the best things about having a 3d printer is the possibility of creating objects that would be difficult to get in a shop.
When we moved to a new place, we brought from the old apartment a shower-shelf that you hang on the door. We had no idea what to do with it- you can’t hang it on the wall, and now we do not have the shower door to put it on.
A bit later we got ourselves a plastic drawer box. The shelf would fit on its back quite nicely, providing additional space for whatever you want. Yet it was not mounted, so I always felt that I might drop it off. To feel more comfortable while moving around the bathroom, I designed the following small piece:

It took 10 min to heat up the printer’s bed, 7 min of printing, 2 minutes of polishing, 5 min of painting, 3 minutes for drilling and 3 minutes of mounting. In half an hour I managed to secure the shelf onto the drawer box with two nice holders. A nice, small success :)


16 March 2014

Neurological box

After some time, here is a next chapter of the "historical" projects.

As one of the first “serious” projects I decided to help my wife by printing a box for glass plates washing. It appears that during some neurobiological experiments you put samples on a small glass plates (around 70x25x1 mm) and then need to put them in some solution for a while. The tricky part is that the solution is quite expensive, and you try to pack several of them together in a vertical position. Of course there are commercial boxes like that, but getting those in a government funded institution is a real pain in the ass. That’s where the 3d-hero enters!
I used FreeCad to design the object. It was nothing extremely complicated, but due to my lack of experience I used quite a long time to make the freakin’ drawing. Here is one of the first models. The thing was supposed to consist of the box and the led.

For some reason I decided that the walls are supposed to be 3mm thick. Not a good idea, but it occurred only during printing.
I also printed the led first and due to scaling mistake I made it too big… I re-designed the top part of the box just to be able to use the led.
Initially I wanted to make the box in one piece, yet I met the height limitation of my printer. For that reason I split the print in 2 parts. Then glue was supposed to fix the problem.
This is when I encountered the next issue. As you might already know, making a 3d object takes several phases: design, meshing, “slicing”, printing, finishing. Design is design. During meshing you create a standardized file that corresponds to the surfaces (STL). The slicing is the process of creating the orders for the printer using the meshed shells. It is like describing how to make an omelet to a machine- move right 3mm, extrude 0.1mm, move forth 2mm while extruding 0.2mm, and so on. You can do this part automatically using for example an open-source program called Slic3r. From what I gathered, in general it always creates commends as follows: print an outer shell (following the geometry), and then print the “inner” part. The infill is some generic pattern- like lines of 45 deg lying opposite to each other on each layer. Unfortunately for me, my object consisted of only small walls. Because of that, the infill was taking forever to print- imagine drawing a straight line when you have to move in space of 2mm and you can only move in 45 deg to the wall… I tried changing angle, but since the lines are always perpendicular to each other on succeeding layers, it ended up printing one layer nicely, and other by making 2mm lines lying next to each other on a distance of 3cm… terrible. In the end I tried to play with the GCode itself, to force the printer move as I like. I also changed the design a bit- made the walls thinner to save plastic. Here is the second design.
After a real torment I managed to make the first models. They were looking OK, the glasses fit, the led closed- success you would say. Well, there was one more test to make- they were supposed to hold liquid. As it appeared- they did not…
In order to save the prints I started to experiment with the finish. I decided to apply acetone on the surface hoping to melt it a bit and close the micro-holes in the plastic. I found in the net that people use acetone vapor to do that. Unfortunately I do not have the space for this kind of play in the house, so I just applied the substance- first with a cloth (bad idea- molten ABS is quite sticky) and then by shortly dipping the part in it. That was even worse idea… The concentrated acetone entered into the pores and cavities in one of the models and started to dissolve it- at least at the bottom of the box. After it changed the plastic into “plastic” pulp, it was clear that dipping any ABS part in a solvent is not the best way to proceed.
The last resort was to cover the surface with glue. It has worked just to some extent, still leaving several leakages.


There were also other tests- with and without acetone applied. In the end, none gave satisfactory results.

One full print of the box sould take around 5h (due to trouble with the infill and because of the small diameter of my extruder). I made at least 4 prints. Then few hours of fine grinding, acetone/glue treatment, and the result was still not satisfactory. At certain point my wife gave an act of mercy releasing me from the promise of delivering the box, and so the project ended… or did it? :)

09 January 2014

Get-back post and the spool holder

It’s been a long time… I believe there were not so many visitors here, so even the disappointment of the lack of content was not so big. People whom I told about this page took a look long time ago, and according to google statistics, there are two other kinds of people getting here: ones that looked for a particular odd sentence and others that were seeking porn. Funny enough the second group of “random visitors” is bigger than the first. It seems naked machines are a real treat :)
Let’s get back to the printer. Even though I haven’t written much (or more precisely- nothing), it does not mean the reprap was standing in the corner catching dust. Well, all right, most of the time it was. Still I managed to do some stuff that will most likely fill two or three entries of this blog. I have to also confess that most of the photos will be made quite late post-factum. Deal with it.
The first things I worked on were connected to the printer. In the old post I described the electronics holders- now it was time for the clumsy plastic spool.
I decided it should be mounted onto the printer on some of a frame. I had quite a bit threaded 8mm rods, so they were to become the main construction. I found out that there will be two kinds of things required: several clamps to bind the rods and the "top" frame part with a fork to sustain the spool on a stick.
In order not to develop the wheel again, I chose the same clamps that were used in the printer itself. After setting up the printer and around an hour of printing I had nice 12 clamps ready. I printed first 1, then another, then 2, then 4 and finally 4. All to be sure that if it starts to screw-up, I will not loose too much time. Here are the models and the result:


After that there was the "U" shape to hold the spool. There was some fun with development of the model, with the following result. Also I give a post-factum close-up picture of the part itself.


And finally, here is the "new" printer with an awesome frame to hold the plastic spool. It makes the threading much easier. During later work with the printer I found out that the spool does not unwind itself during process- it is too heavy and the plastic is a bit tangled. This might cause the blockage or problems with feeding. Yet it is much easier just to turn the spool on the frame opposed to playing with it when it is laying around. And the whole thing is much more compact and easier to move.


That is it for the come-back post. There are much more to come, so if you are just tuning in, stay on ;) Till next time!

17 May 2013

It's printing time!

Well, the time passes, and as a caterpillars drop their hideous form, I dropped the "students suit" and changed into a beautiful unemployed butterfly ;) Hopefully I will get the wings open soon.

At the same time, even though I sill have some things to be done, I managed to work on the printer.
AND IT IS AWESOME :D

First of, after over a month of travel from China, my Kepton tape came to me. For those how do not know (most likely quite a lot of you), its a high temperature resistant adhesive tape.


Throughout the forums and other Reprap blogs, it is claimed to help the sticking of ABS plastic to the surface. The pics above show the tape after some usage. And my verdict is: it helps :) At the same time, throughout the prints I have done so far, I learned that the temperature of the bed can not be dropped too much after the first layer. Right now I print the 1st layer with 110C and all the others at 95C.

And now for some show-off :D

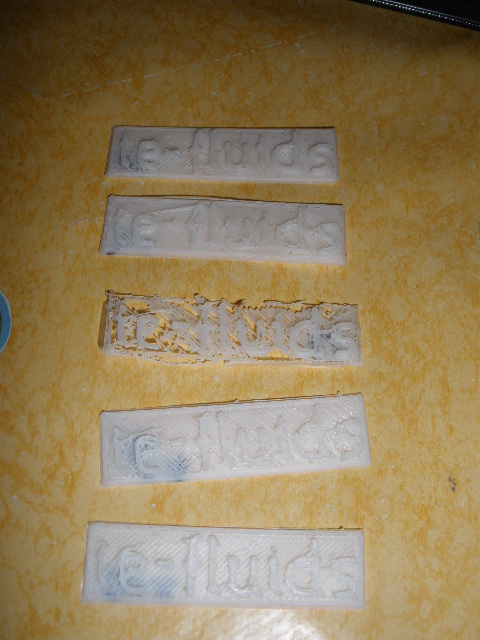
The first "real" prints I tried, were labels with the name of my PhD group:


The successive prints come from the top. The first print, using my intuition to set the parameters, went really well. The small details were good, but I was not very satisfied. For the second one I lowered the speeds, thinking that this will improve accuracy. Well, the results got worse. The third print was even slower. As you can see, it did not work that well. After that there were several other trials. I had to twitch the Z-axis, change parameters, re-tape the mirror (since tape got scratched). In the end, the fourth plate from the top is version 9. Earlier stages did not get through first 1-3 layers. And the last attempt was the bottom one- version 10. Throughout those test I managed to significantly improve the quality of the bottom "big" plate. Unfortunately I lost some quality at the details, and being a bit scatty I started archiving settings starting from 2nd setting ;) Well that is a thing to learn.

And regarding the settings archive. As you may read in earlier posts, I use Slic3r for "g-code" generation and Pronterface for printer control. I plan to start posting my Slic3r settings later for common benefit, but this will happen when I will feel that they give good enough results.

Now, the labels were done few days ago (though will get back to them soon), and today I did some more printing. This time I took on the workshop the issue of my electronics just laying on the table. I would like to have it attached to the printer. With that in mind, I made some parts:


You can see 5 prints, but only 3 are good. The first one failed when the left leg dis-attached itself from the bottom. The second one was going quite good, until it also got peeled off the plate. That was the moment I realized that I need to keep the plate's temperature higher throughout the whole print.
If you look closely, you will notice that the third print is not done completely. There are 3 layers missing. What happened is that I run out of plastic. Of course there is an option to pause the print and replace the filament. Well, I did just that, but again, being a bit scatty I pressed the button Restart instead of Resume. The software does not forgive this kind of mistakes... At the same time, the part was already done to the level, that I think I will still use it. Now for the two other ones- just take a look in owe :) I still need to clean them up a bit, but this is necessary after most of the prints. In whole honesty, I have to admit that I am still having some issues with the first layers, and I believe that I may get a better quality, but gosh darn it! These parts are freaking cool :D

And now regarding the last print today- we do not have much space at home right now, and I have been occupying it quite a bit with my machinery, making tones of racket with the engines for few hours. For that reason I just had to do the following. What you are about to see are the beautiful hands of my lovely, patient, and supportive wife holding a small piece I printed for her. Enjoy and feel special for having the possibility to watch those pictures ;)


If you have been wondering, I made all the designs used for prints mentioned in this post (and there are more to come, just waiting on the hard drive). I used the open-source design environment Salome to generate *.stl files (which originally I use to prepare meshes for my fluid dynamics experiments). If you are interested in the designs- just contact me ;)

That is it for today! Expect more and more posts coming soon, with more and more awesome prints! One day maybe even a movie ;) Till the next one!